Tuesday, December 20, 2011

Warm Up with Garden Tomato Soup

It has been a long long while...
SInce I am here in Germany.....Loving the life of two adorable children, one being handicap, I am still an extreme foodie and family cook.  I seriously do not know better chefs in the world than those who cook for their families.  So I am BACK!  Dana Poole,  a good friend of mine, always tells me she eats my stir fry lettuce wraps, so I thought, I need to get back into the groove.  I am going to document what I cook here in Germany, why not?  I still cook 7 nights a week, so there is bound to be something you like right?  LIke this Garden Tomato Soup.  So simple, yet completely delectably satisfying.
*****IMPORTANT INFO******
I have made changes to this recipe since I took pictures.  I actually took these pictures in the summer before we moved to Germany.  I add one can of chicken stock or veggie stock to it.  So add it before you add the tomatoes..... 


Recipe


4 cloves of garlic, minced
1 red onion, diced
1 cup diced carrots
1 yellow or green squash
1-2 stocks of celery, diced
a hand full of fresh flat leaf parsley
juice and zest from 1 lemon
1- 28 ounce can of tomatoes, OR 28 ounces of fresh tomatoes, blanched with skins peeled
1-10 ounce can of chicken or veggie broth
salt and cracked pepper to taste


Fresh simple ingredients...


always start your pot by coating the bottom with extra virgin olive oil....  yummm


Dump all veggies in together!  Except tomatoes and broth...that comes later

add salt and fresh cracked pepper, stir so all veggies are coated with the olive oil


Add the grated lemon peel 


and lemon juice.....


put the top on and let the veggies simmer till the onions are transparent, add more oil if your veggies are looking dry...

Add tomatoes and chicken or veggie stock to the veggies once they are cooked and ready, simmer for 30 min-1 hour


Puree the soup till it is the consistency you like

To make things better, put the soup in ramekins and throw a piece of mozzarella on top.  What did mozzarella ever do to you?


Put under broiler for a minute or two.

Add a little parsely for garnish.  And there you have the perfect garden tomato soup


Wednesday, March 9, 2011

Sauteed Green Beans in Butter and Garlic with Macadamia Nuts and "The Jimmer"


I remember sitting at the table as a kid waiting to say a prayer on the dinner.   Then passing the food around the table.  I always cringed when the green beans were passed my way.   But, I'm an artist, I can't have my plate be only two colors right?  Usually roast with potatoes.  So I reluctantly would put the green beans on my plate.
They were canned.
Which are fine, sometimes still, but I never knew the glory of the true, fresh green bean till my later years.  It wasn't just my family who ate canned green beans, everyone I knew had them.  I associated all green beans to the canned green beans.    Then one day I had fresh delicious, aldente green beans.  Beautiful creatures, let me pop you my mouth!  Muaaahah haha!
 So here is to the fresh green bean that changed my world!  I have used other nuts with this dish but I decided to use Macadamia nuts because they have such a beautiful crunch in your mouth,  Added with the crunch of the green bean, Oh my.

Recipe:

1 1b. Fresh Green Beans, Trimmed.
1/4 cup butter (or olive oil is fine too)
2 cloves of garlic, minced
salt and pepper
1/3 cup of Macadamia nuts, chopped

Trim the stick end of the green beans, so fresh so delicious!


Macadamia nuts.....

Chop em' well!


Melt the butter and add the Green beans over medium heat.  Keep turning them so you don't burn the bottom ones.  It will probably take 5-8 minutes to cook them aldente, taste test them until you reached your desired donness.


About a minute before you think they are done add your minced garlic, 


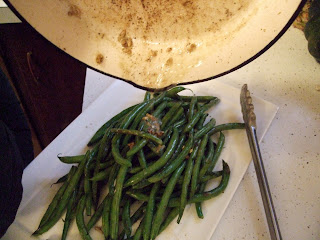
Place the green beans on a plate and pour the dripping over them.....yummm...

then garnish with chopped macadamia's... you can't get much better than that!


My husband said this side was worth 7.99.  But with the grilled Cheese with it...well we'll see


"The Jimmer"
Grilled Cheese and Brisket Sandwich
I actually took this picture, you can see good ole' Jimmer, number 32!  This was the game against San Diego State....oh what a game!

Who doesn't love Jimmer Fredette?  Seriously, the guy is awesome he totally deserves a sandwich named after him.  My husband and I were lucky to be able to see him play at the Marriott center a few times this year, and he did not dissapoint!  I just love that Jimmer.  But not in that way of course, my husband is kind of jealous and he actually asked me to cut his hair like Jimmer's the other day!  I loved it!  Sometimes I pretend like Jimmer is going to come over for dinner, and I'll say to Bryce, "Oh yeah, I forgot to tell you, Jimmer is coming over for Dinner tonight!  I better clean the house!"  So if he were to come over , I would make him this, and tell him I call it "the JImmer", so here is to you Jimmer Fredette!
    I take sandwich making very seriously.  So  I decided to use the texas brisket that my parents gave us for christmas and put it to some use.  So if you want to switch the meat for anything else seeing as brisket isn't the most readily available style of meat around.  Feel free.   

2 slices of good bread
cream cheese
dijon mustard (I have this special kind of mustard I got from a french deli, it is walnut mustard)
tomatoes, sliced
spinach
thinly sliced red onion.
good melting white cheese, I used Tilamook Monterey Jack
and meat, I used brisket

Spread Cream cheese on both slices of bread
then spread the mustard over the cream cheese.
place your cheese sliced on both sides of bread (you do this so it melts faster)
then you add your tomatoes, onion, spinach and meat.  
 Grill it using a panini press, or right on the stove....if you do it on the stove put a lid over it and use low heat, that way the cheese melts with out burning your bread.


Wala!


The sandwich was 10.99!  That is expensive!  I was pretty happy with that, my husband said it was his favorite.

Thursday, March 3, 2011

Hashbrowns Done Right.


Okay, everybody has had hashbrowns.
 And everyone I know loves hashbrowns.
Has anyone found that when making them at home they get mushy and they just don't turn out quite as crisp as the diner down the street?
Or, let's just be honest, who buys pre-packaged hashbrowns?
This is a fool proof method for crispy, stringy, soft, delicious Hashbrowns

By the way, all my recipes are for like 10 people so you can half them if you want.  Bryce and I save money by eating the leftovers for the lunch the next day so it gives us enough for 2nds.  Which I love 2'nds!

Okay for the recipe.

10 small-medium sized russet potatoes, peeled
1/4 cup butter
4 Tbsp. oil (I like olive but whatever you have is fine.)
Salt and pepper to taste.


Start out with delicious Potatoes and Peel'em!


In your food processor (if you don't have one, use a cheese grater they work just as great) use your grater and grate your potatoes by throwing them in whole and watch them grate up like crazy fast!

Then put the potatoes in a large kitchen towel


Wring out the water!! There will be more than you think.  


When most of the water is wrung out from the potatoes heat up your skillet with the half the butter on the  recipe and half the oil.  You will have to make this many hashbrowns in two batches.


Spread them out in a layer on your pan.  And the next Ingredient I almost forgot.....PATIENCE!  It is crucial you do not fuss with your potatoes.  Just leave them there, they will be fine, they won't miss you I promise. Sprinkle the salt and pepper over the potatoes.


When the bottom edges start to brown and look crispy then it is time to flip it over. 


I flipped just like you would flip a pancake, if it breaks just flip the section over like a pancake as well.  Wait again for the bottom edges to start to brown and you have yourself perfect hasbrowns....everytime!!


Yummmm.....nothing like a hungryman's breakfast for Dinner!


I want to eat them, so I will go and enjoy these golden beauties!

Husband said he would pay: 11.99 for this whole meal, we also had peppered bacon and scrambled eggs.  I am particular about how to cook those as well, but that is a whole other post!

Happy eating!


Natural DELICIOUS Energy Bars

These energy bars are a recipe from my sweet herbalist sister Laura.  She is amazing and has a website of her own to fix all your booboos and offers great health advice.   Go here  theurbalist.com
She is cool.  Oh, did I mention she lives in England.  Yeah, I know.
Anyway,  she gave me this recipe and I fell in Love!  Just four ingredients.
The great thing about recipes with little ingredients is the following:

1. You don't have to buy as many things.
2. You feel cool saying, yeah it's just four ingredients!
3. Its easier to cook, or put together.
4. If you have a bad memory, you only have to remember four things.
5. They taste wonderful!

SO HERE IS THE RECIPE:

2 1/2 cups raw almonds
1 1/2 cups raw flaked coconut
2 cups unsweetened dates
1/3 cup coconut butter

Thats it!  I can hardly believe it myself!   On top of everything else, it is gluten, dairy, wheat, meat, sugar free!!  And I promise that they are delicious.


Here are all the ingredients for the bars.... so little ingredients!!


Add the almonds to your food processor


Then the coconut
  

Then the dates


seriously the most delicious stuff on earth....yummmm


then the coconut butter


turn on your machine!  Let it mix for 1-3 minutes


When it is all done the mixture will be somewhat crumbly.  I suggest using a silpat to spread the mixture on.


Score the patted down mixture with a kife into the desired size bars you want.  I like mine big!


Once you are done scoring, put in the refridgerator for at least an hour before breaking them apart.  They will break naturally to the shapes you cut.


And there you have it!   Delicious Healthy quick on the go snack!  I suggest putting these in baggies and keeping them refrigerated.  They hold better that way.  Even though there is nothing perishable about them.  p.s. I have already eaten two today.    

Husband priced them at 1.99 each.   Hey I am saving quite a bit of money making these babies at home! Bryce took one to work on his way out.  I love it!